The overlying goal of this Fine Arts project is to turn classic paintings into 3D models which can be printed. The idea was inspired by this article, which talks about how people are doing exactly this in order to allow for the blind and otherwise visually impaired to “see” classic paintings by feeling them with their hands.
The full document with curriculum connections and activity design can be downloaded right here for you to access and modify as needed: High School Art: 3D Paintings
You can also find this activity and the models that I built here on Thingiverse.
Real-Life Connections: As I stated above, there is an endeavor already underway to create digital and physical 3D representations of classic art which the visually-impaired are either unable to appreciate or can only appreciate to a limited extent.
Design Programs: There’s little doubt in my mind that only one of the more powerful software options will do for this project. 123D Design and 3D Slash won’t be able to cut it here.
For the example that I produced below, I used Blender, although there were some small problems that I encountered from the limitations of its sculpt mode. ZBrush would also make a good choice, and though 123D Sculpt is designed with sculpting in mind, it is probably not powerful enough to handle this particular task. (Don’t let that dissuade you or your students from trying, though!)
Something else that I find interesting using a posing software such as DAZ Studios or Poser to render a scene with 3D models, although most of the content that would be needed to be able to produce this either costs money or is not very 3D-printer-friendly. Still, it would be a different approach to take that might pan out well depending on the scene.
Results: I made this exemplar using Blender 2.74. First I chose a painting that I liked, Ludolf Backhuysen’s The Coming Squall.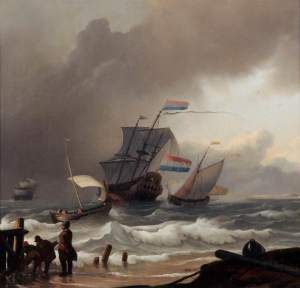
Then I placed the image into Blender as the background for top orthographic view and started cutting out shapes for the major figures in the scene: the sky, the ocean and beach, the ships, the people, and the debris. I extruded them all so that they were at different “levels” in the scene, ahead and behind each other. I ended up turning the sea and the beach into one object and making it slope backwards to the horizon. If I were to do it again, I would try to choose some particular scale for the slope and “levels” of the objects in the scene.
After I had all the objects sorted, I began to texture them. One of the limiting things about using traditional 3D printers for this project is their layer heights, which could severely limit the details you could put into the final printed model. It was for this reason that I ended up putting a base at the bottom of the painting and printing it standing upright instead of lying down flat. In the end though, you and your students shouldn’t put too much effort into exacting details since the printed result likely won’t show them. That is, of course, unless you wanted to do a multi-part piece to make a large-scale painting like what was demonstrated in the video above.


")
")
")
")
")
")
")
")
")
")
")
")
")
")
")
")
")
Differentiation: There are many different ways to accomplish this goal within Blender alone. Originally I was planning on simply having a flat “picture” which would be printed from the flat on its “back.” In the end I decided to put a base on the model with the title (next time I’ll look for a Braille font).
This painting also ended up having quite a bit of “depth” to it, with the foreground coming out much farther than I’d originally intended it to. I attribute that change to the fact that this is a large scene with a lot happening in the background as well as the foreground. If I’d gone with a portrait then I would probably not have made the scene as deep as this one is.
If you want, you can also have your students paint their finished and printed models, although I might simply offer it as a suggestions after the fact. Going from the track of benefiting the blind, depending on the level of blindness that a person experiences, colour may or may not help them visualize the painting. Too much paint could also ruin the final texture.
In the end, this is an art course and my opinion of that is that students should be allowed to explore what interests them. I wouldn’t confine my students to particular types of paintings, although I would also have them check with me before they begin because it wouldn’t do to have them try to do a painting that’s “too easy” to model. Like this one, for example.
One last this is that even though this project was designed for the high school level, there is no reason why a junior high student with the proper technology background couldn’t do a similar project.
Assessment: I included a rubric in the document above, but you’re free to take what you’d like and leave the rest. Basically, I would make a final summative mark dependent on the likeness to the original, the approach to the representation of the scene in 3-dimensions, the progress photos that the students take, and the “feel” of the final product (as a blind person might “see” it).
One thing to note of course is that looking like the original painting shouldn’t be a heavy criteria since the lack of paint on a model might make such similarities vague, and also because the emphasis should be on the feel of the product as opposed to the look of it.
An interesting idea would be to grade part of the final mark without having first seen the finished model, but by touch alone. I’ll leave that to your discretion though.
